


GBP/AUD is showing early signs that its recent rally may be losing momentum.
Price has pulled back from recent highs, raising the possibility of a broader consolidation or deeper retracement.
Traders will be watching for continued selling pressure or signs that buyers are ready to regain control.
Welcome to “TA Alert of the Day.” Each day after the market close, MarketMilk scans for popular technical indicator alerts. We use these alerts as the basis for a mini-lesson, breaking down what each alert means, why it matters, and how traders might interpret it. The goal is to help beginner traders not only spot these alerts but also understand the logic behind them and how they can inform trading decisions.
What MarketMilk Has Detected
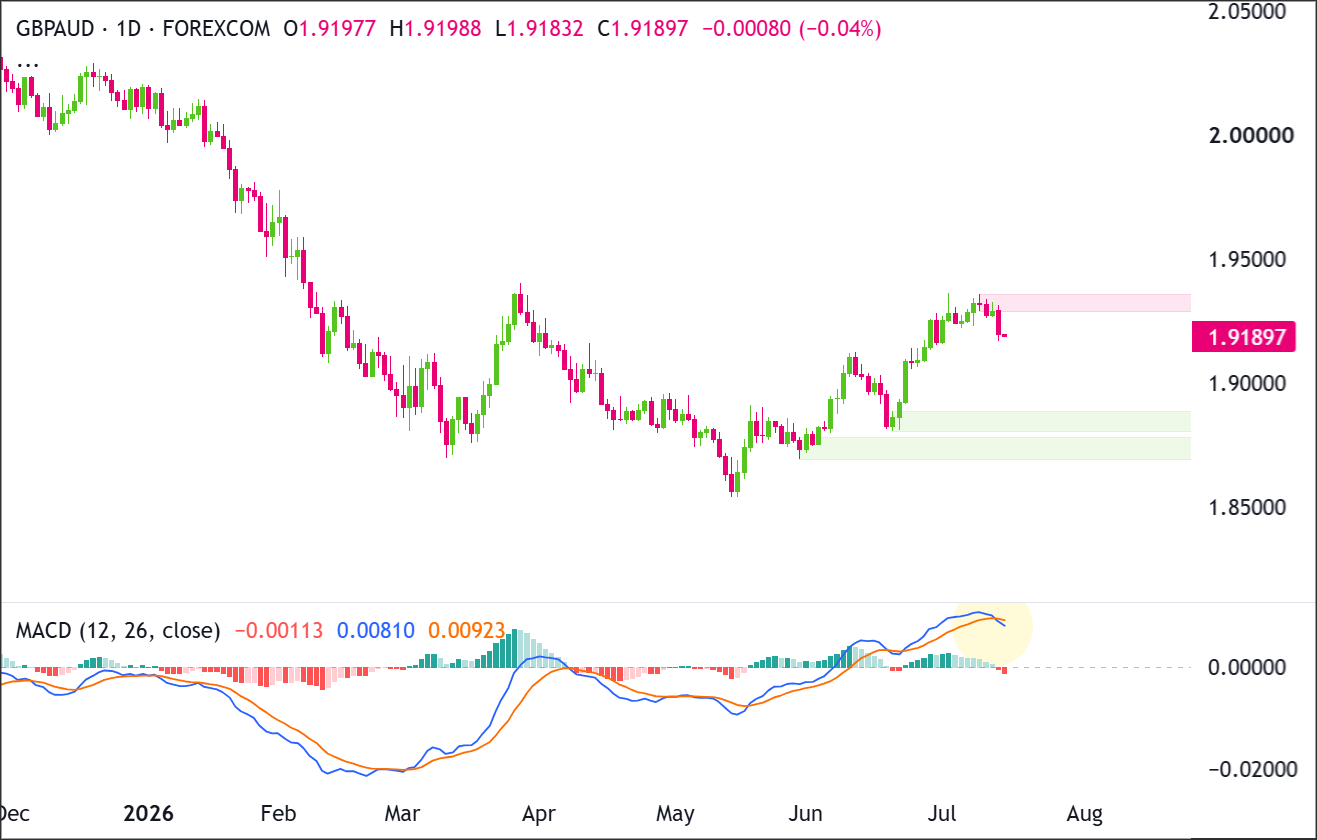
GBP/AUD has printed a bearish MACD crossover on the daily chart, with the MACD line moving below the signal line.
What This Signals
A bearish MACD crossover often marks a loss of upside momentum and can attract sellers when it occurs after an extended rise.
If the move is sustained, it suggests that upside pressure is fading and that price may spend more time consolidating or falling back toward prior breakout areas.
However, this same pattern can also represent a pause within an ongoing uptrend.In trending markets, MACD crossovers can arrive late and sometimes occur right as price finds support, where prices briefly dip, trigger momentum signals, and then re-accelerate higher.
If GBP/AUD quickly reclaims the 1.928–1.932 area, the crossover may end up being a whipsaw rather than a trend change.
The outcome depends heavily on follow-through in price action, the market’s reaction around nearby support (1.914–1.916 and 1.900), and whether momentum continues to deteriorate (e.g., histogram staying negative and MACD moving further away below the signal line).
How It Works
MACD measures momentum by comparing two exponential moving averages (typically the 12-period and 26-period EMAs).
The MACD line is the difference between those EMAs, and the signal line is an EMA of the MACD line (commonly 9 periods).
A bearish crossover occurs when the MACD line crosses below the signal line, indicating momentum is shifting down relative to recent conditions.This indicator is best understood as a momentum and trend-confirmation tool rather than a precise turning-point predictor.
It can help identify when a trend is strengthening or weakening, but it does not define support/resistance by itself and can lag during sharp or fast-moving phases.
Important: MACD crossovers can be prone to whipsaws when price is choppy or range-bound. Reliability often improves when the crossover aligns with structure (breaks of support, failed retests) and when the move is confirmed on a higher timeframe (for a daily chart, the weekly view can help clarify whether momentum is broadly turning or simply flattening).
What to Look For Before Acting
Don’t assume a sustained downtrend. Consider these factors:
✅ Whether price breaks and holds below 1.914–1.916 (late-June support zone)
✅ A daily close below 1.900, which would put price back under a key psychological/structure level seen throughout June
✅ Evidence of lower highs forming beneath resistance at 1.928–1.936
✅ MACD histogram staying negative and expanding (showing downside momentum is building, not just flipping briefly)
✅ A failed rebound/retake of the crossover area (price bounces, then stalls and rolls over)
✅ Weekly chart alignment (e.g., weekly momentum flattening or weakening rather than continuing to rise)
✅ GBP and AUD drivers: upcoming BoE/RBA communication, inflation/employment prints, and shifts in rate expectations that can change trend conditions quickly
✅ Broader risk tone (AUD sensitivity to risk sentiment and commodities) confirming or contradicting the bearish momentum shift
Risk Considerations
⚠️ Whipsaw risk: MACD crossovers can flip back quickly if GBP/AUD rebounds into 1.928–1.932
⚠️ Support proximity: selling into nearby support (1.914–1.916) can reduce reward-to-risk if the level holds
⚠️ Event risk: UK/Australia data surprises can invalidate momentum signals in a single session
⚠️ Trend-lag risk: MACD is reactive; the pullback may already be well underway by the time the crossover triggers
Potential Next Steps
GBP/AUD has built a short-term recovery from the May low, producing higher lows and reclaiming 1.9000, but the advance is now testing a major resistance zone around 1.9280–1.9350.
Deeper support sits at 1.8790–1.8870, followed by the broader demand zone at 1.8680–1.8770.
Add GBP/AUD to a watchlist and monitor how price behaves around these support/resistance zones.
The latest rally stalled inside 1.9280–1.9350, where sellers produced a rejection and pushed price back toward 1.9190.
Buyers need to hold above 1.9000–1.9050 and close through 1.9350 to restart the advance, while sellers need a decisive break below 1.9000 to confirm that the recent higher-low structure is weakening.
Trade Idea: Bullish Continuation Scenario
Setup
The bullish setup depends on GBP/AUD holding the former breakout area around 1.9000–1.9050 and eventually clearing the supply zone at 1.9280–1.9350.
A daily close above 1.9350 would confirm that buyers have absorbed the selling pressure, while a controlled pullback that stabilizes above 1.9000–1.9050 could provide an alternative continuation setup.
The MACD crossover means confirmation is especially important because upside momentum is currently cooling.
Entry
Consider entering long on a daily close above 1.9350, confirming that buyers are breaking out of the recent structure.
Alternatively, enter on a controlled pullback into 1.9000–1.9050 if price stabilizes there and turns back higher.
If price loses that support zone and closes decisively below 1.8970, stand aside and wait for either deeper support to form or a cleaner breakout later.
Stop Loss
For breakout entries: stop on a daily close back below 1.9280. That would invalidate the breakout by showing price could not stay above the former ceiling.
For pullback entries: stop on a daily close below 1.8970. That would invalidate the support-hold idea and show buyers are no longer defending the zone.
Take Profit
Target 1.9500, because that is the next clear upside area on the chart and the most natural place for price to retest if the current recovery continues.
Bottom Line
The bullish case strengthens on a daily close above 1.9350, which would clear the current supply zone and open the way toward 1.9500.
A close below 1.8970 would invalidate the near-term continuation setup by confirming that price has lost the reclaimed 1.9000–1.9050 area.
Trade Idea: Bearish Pullback Scenario
Setup
The bearish setup is based on GBP/AUD failing beneath 1.9280–1.9350 while MACD momentum continues to weaken.
Sellers would gain stronger control if price closes below 1.9000, exposing the first demand zone at 1.8790–1.8870.
A renewed rejection from resistance followed by a close below 1.9180 could also signal that the pullback is extending.
Entry
Consider entering short on a daily close below 1.9000, confirming that the support zone has failed.
Alternatively, if price pushes into 1.9280–1.9350 and prints a clear bearish rejection candle, enter short on the next daily close back below 1.9180.
If price instead breaks and closes decisively above 1.9350, stand aside, as that would invalidate the bearish pullback idea.
Stop Loss
For breakdown entries: stop on a daily close back above 1.9050. That would invalidate the breakdown by showing price has reclaimed the support zone.
For rejection entries near resistance: stop on a daily close above 1.9350. That would invalidate the bearish idea by confirming buyers have pushed through resistance.
Take Profit
Target 1.8790–1.8870, because that is the next major support area below the current structure and the most likely place where buyers would try to step back in.
Bottom Line
The bearish case remains active while GBP/AUD stays below 1.9280–1.9350, with a daily close below 1.9000 confirming a deeper pullback toward 1.8790–1.8870.
A decisive close above 1.9350 would invalidate the bearish setup by confirming that buyers have broken through resistance despite the recent MACD rollover.
This content is strictly for informational purposes only and does not constitute as investment advice. Trading any financial market involves risk. Please read our Risk Disclosure to make sure you understand the risks involved.